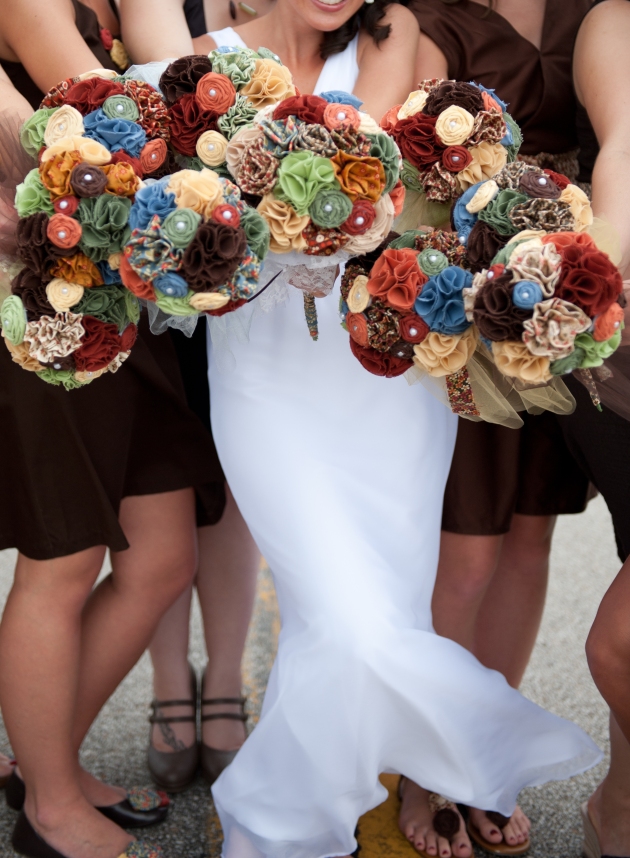
This time a year ago was a pretty hectic time. My sister-in-law was engaged at the very beginning of the year and was getting married in the middle of June- leaving about 6 months to prepare everything for the wedding. And, when you want to make as many of the wedding details you can, 6 months is not exactly a leisurely time frame in which to prepare. Add in the fact that she had 9 bridesmaids and a modest budget and you have to get creative!
One aspect of the day that took a while to figure out was the flowers. The bride wanted to go with something other than fresh flower bouquets so we looked at the popular vintage broach option- but with a short time frame to find enough for 9 bridesmaids + 1 bridal bouquet, that was pretty quickly ruled out. I suggested covering foam balls with fabric flowers but after seeing how expensive those balls are, we ruled that out too. She still liked the idea of using fabric flowers as we could incorporate them elsewhere into the decor and the bridesmaid’s outfits, so I kept trying and then came up with this:
She loved it- so we had a bouquet making day where each bridesmaid made her own flowers and designed her own bouquet. And the results were pretty awesome. (Even if I do say so myself!)
***These 3 pictures were taken by Jasmine Nicole Photography. She is currently located in New Mexico but sometimes travels to Chicago area… she did a fantastic job photographing my sister-in-law’s wedding!***
And, we each got to keep our bouquets- mine is hanging out on our mantle currently. If you’d like to learn how to make one, we’ll start with the rolled rosettes today.
Here’s what you’ll need:

Strips of fabric (I used cotton), hot glue gun and glue sticks (I used a low temp gun), some felt, pearl beads, and some stems. I used pipe cleaners for this tutorial but would recommend floral wire stems as they are stronger and less fuzzy. 🙂
Step 1: Take one of your strips and fold the raw edges into the middle. Then fold the strip in half and tie a knot at the end.


Step 2: Glue a bead onto the top of the knot.

Step 3: Then start to wrap the folded strip of fabric up around the bead. Keep folding the fabric strip over itself and wrapping it around the center- gluing it as you go. (Hint: As you glue, try to keep it toward the bottom of the rosette so that it doesn’t show at the top of the flower)


Step 4: When you make the flower as big as you want it to be, you’re going to add some glue to the back and bring the strip around to the back. It’s probably easier to see than read…


Step 5: Trim the excess fabric. Then add a bunch of glue to the back and press it down onto your felt. Once it’s dried a little, cut out the felt around the flower.


Step 6: Now it’s time to make the stem. Take one of your pipe cleaners and fold about 1/5-2 inches of it back on itself (into a loop) and twist it around itself to secure.

Then fold the loop at a 90 degree angle to the rest of the stem:

Step 7: Add some more glue to the back of your flower and press the loop of the stem into it.


Step 8: Then, add another small piece of felt over the loop… pressing it down into the glue. This helps make sure that the flower will NOT fall off the stem!

Step 9: If you’ll notice, the stem is not coming from the center of the flower. To fix this, and help make it just a little more secure, fold the stem back onto the felt until you reach the center where it should pivot and stick straight out of the back of the flower.

That’s it! Repeat with as many rosettes as you want to make!


Happy flower making- and stay tuned for more tutorials on how to make the other types of flowers to complete your handmade bouquet.
-Elise


Thanks! These are beautiful!
Thanks! 🙂
they all turned out so wonderful!
Thanks! I’m still enjoying mine but more importantly, the bride loved them.
Oh my goodness these are simply beautiful! Thank you so much for sharing at Mix it up Monday and I hope you’ll stop back soon 🙂
So creative!
Love this idea and they turned out beautiful!